
See the VTelevision User Guide for details.
If you are looking for information about VTelevision that is not here, refer to our support page, or contact us.
VTelevision Service
VTelevision is available to all who have GigE fiber optic service with VTel. Because VTelevision is IPTV (meaning it comes into the house the same way the Internet does), it is only accessible over VTel’s GigE fiber optic Network. It is not available over the legacy DSL copper network. If you are unsure whether you are on the GigE fiber optic network, please contact VTel at (802) 885-9000 or toll free at (800) 279-4049.
VTelevision is offered in a Triple Play package with unlimited long distance calling and 1 gigabit Internet or with Double Play with a 1 gigabit Internet connection. The prices differ depending on what television package you choose. For current prices visit the Triple Play or Double Play page or call VTel at (802) 885-9000 or toll free at (800) 279-4049.
VTelevision can be placed on vacation for a small holding fee, just like VTel phone and Internet services. Read more about our vacation services here or call VTel at (802) 885-9000 or toll free at (800) 279-4049.
If you disconnect before the end of the 2-year contract, you will be charged $25 for every month left in the contract, which will be billed to you in one lump sum.
There are several things that may be changed at any time on a month-to-month basis. If you have the Select package, the Mini-Packs may be added or dropped each month. Also, feel free to add and drop premium movie channels on a monthly basis at any time during your contract. During your 2-year contract, you can move your overall service to a higher level tier. For example, if you initially choose Select, you can move your service to Premiere at no charge. Moving to a lower level tier during the contract may incur a fee. Call VTel at (802) 885-9000 or toll free at (800) 279-4049 to determine what it would cost.
At this time, VTel is only offering their VTelevision service in a package with 1 gigabit Internet. Bundles with Internet & Voice also available.
If you find a lower price for comparable service from a competitor, tell us and we’ll beat that price and pay you $10 for letting us know. We’ve never never found a price that we could not beat!
Set-top Boxes
A set-top box is what takes the signal coming to your house from VTel and changes it into a format that can be read by your TV, so VTelevision requires a set-top box. Additional video services from over-the-top providers such as Netflix, Hulu, Google, Amazon, etc. require separate hardware, but perform beautifully over a fiber connection alongside VTelevision. See Over the Top for more details.
You need a set-top box for every TV on which you wish to view VTelevision.
HD streams are limited to 3 concurrent streams; keep in mind that if you have a HD DVR, each show that is being recorded at any given time will count as a channel; there is a limit of 2 HD DVR streams at one time. In other words, if you are recording one HD show, you can only watch two other HD shows at a time. If you are watching a show that is being recorded, it will only count as one channel. Otherwise, two televisions tuned to the same channel will count as two different channels for the purpose of counting. If you try to exceed these limits, one TV will freeze, you won’t be able to change the channel, or the screen will say either “All HD services are in use. For HD viewing options, press OK” or “All TV services are in use. To proceed: power-off another TV receiver or select a recording to stop.” It will then give you options to stop recordings or stay on the channel.
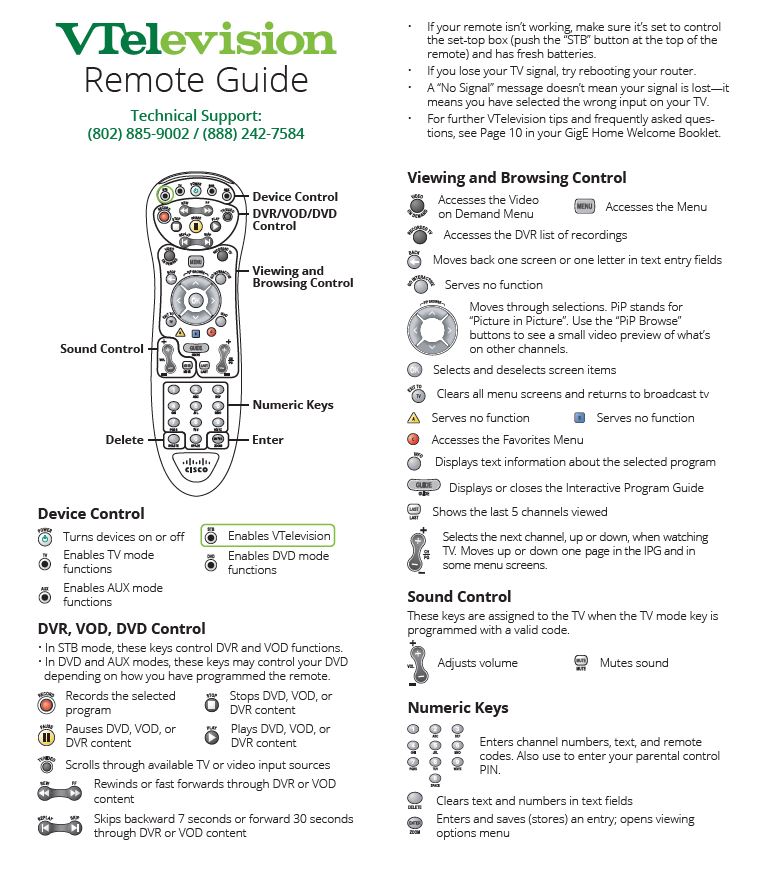
Remote Control
Need assistance using your VTelevision remote control? Refer to our quick reference guide here.
VTelevision works with the set-top box remote control that is provided with your set-top box. You can, however, program your set-top box remote control to control your TV, DVD player, or other auxiliary device. See the instructions that came with your remote, or view them here. A universal remote can also be programmed to work with VTelevision, but will offer different functionality.
If you lose or damage your remote, VTel will provide a replacement for $20.00 plus $7.95 S&H. Additionally, express shipping services are available (next day delivery if ordered by 3pm and next day is a business day, where/when available) at an additional cost. Since you are leasing the set-top box and the remote from VTel, you will be expected to return the newer remote when you terminate your service. If the remote is not working due to a manufacturing issue, we will replace it for free.
Guide
We receive the guide information from a third party, which is then displayed in the guide. If you have any questions, please contact us at (802) 885-9002 or toll free at (888) 242-7584.
You can move forward in the guide by 24 hours with the fast forward button. While in the guide, simply press the “FF” button at the top of the remote. This will take you to the same time on the next day. You can also press “REW” to go back by 24 hours.
In addition, you can move to specific dates and times by getting into the guide and pressing “Enter”. Select “Jump to day & time” and then choose the time you would like to see. If you choose “Tomorrow” or any other specific day, it will take you to primetime on that day (primetime starts at 7:00pm).
Several channels allow for a time shift, meaning that you can watch shows that have been on within the last four hours even if you don’t have a DVR. The channels that allow this are marked on the guide with an arrow pointing back in time. Shows in the past that are available to watch are highlighted in blue.
- You can customize your channel lineup to skip channels you don’t want to see both in the guide and when you flip through the channels. To do this, press “Menu” and choose “Settings”. Select “Television” and then “Customize channel guide”. This will bring up a list of all the channels with check marks next to them. Simply uncheck the channels you don’t want to see and save the changes. If you wish to see those channels at a later date, go back to the list and check the channels you want or select “Check all” to see every channel again.
- You can change the order of the channels in your channel guide. Press “Menu” and choose “Settings.” Select “Television” and then “Customize channel guide.” In the left hand menu, choose “Change order.” This brings up a list of all the channels in their current order. Use the arrows to move channels up or down and save your changes. After you have changed the channels, they will be in your customized numerical order starting with one (1).
You can create a list of your favorite channels so that when you go to the guide or flip through the channels, you see only your favorites. There are several ways to set up this list. First of all, if you are on a channel and you would like to designate it as a favorite, simply press “Enter” and select “Add to favorites”. If you press “Enter” and it is already a favorite channel, you will see “Remove from favorites”. To add more channels at a time, you can press “Enter” and choose “Change favorites” or you can press “Menu”, and under “Live TV” select “Favorites” then click “Edit favorites”. You will see a list of all the channels. You can go through and select which channels you want to appear in your favorites list. Once you are done, make sure you save your changes. You can also access this same list by pressing “Menu”, selecting “Settings” and then “Television”. Choose “Set up favorites” and click your favorites list.
Once you have created a favorites list, you can activate the list by pressing “Enter” and selecting “Favorites lists”. Select “MY FAVORITES” and you will see only the channels in your list. To switch back to seeing all the channels, select “All channels”. You can also switch between these lists by pressing “Menu” and under “Live TV”, selecting “Favorites” then “MY FAVORITES” or “View all channels”. You can also set up your guide to skip channels you don’t want to see.
Programming
After difficult negotiations with Nexstar Broadcasting, Inc., which owns the Fox affiliate WFFF, and Mission Broadcasting, Inc., which owns the ABC affiliate WVNY, we were informed that we could not show WFFF and WVNY in Windham County. These networks originate from Burlington and are part of the Burlington Designated Market Area (DMA). Unfortunately Windham County falls into the Boston DMA. These DMA’s have been set for decades by the FCC, and because of complicated rebroadcast laws and regulations, we were unable to reach an agreement to show these stations outside their assigned DMA.
To ensure that Windham County residents have ABC and Fox options available to them, we have recently managed to finally bring the ABC and Fox allifiates from Boston to our Windham County customers. Those customers can watch WFXT Fox Boston (which is available to our Windham County VTelevision customers only) and WCVB ABC Boston (available to all VTelevision customers).
We have been able to reach agreements with the other broadcast networks to show their channels in both the Burlington and Boston DMA’s, so there is no danger at this time of losing other channels because of this issue.
You can set up parental controls to lock certain channels or all programming with certain ratings. A locked channel can be unlocked for a certain amount of time or for a specific program with a PIN you set. To set up the parental locks, press the “Menu” button on the remote. Select “Settings” followed by “Parental controls.” Select “Parental locking” and the system will prompt you to put in a four-digit PIN using your remote. Chose four numbers that will be easy to remember but not easy to guess. After you have set up the PIN, you will be able to select certain channels or certain television and movie ratings to lock. After you have saved these locks, every time you switch to that channel or a program with those ratings, it will show a blue screen that says, “Press OK to unlock this program.” You can use the PIN to unlock the current program or to unlock all TV for the next four hours. The parental controls also lock recorded programs which can be unlocked in the same way as live TV. If you forget your four-digit PIN, call VTel at (802) 885-9000 or toll free at (800) 279-4049 to have it reset.
You can search for a specific channel by pressing “Enter” found on the bottom right of the remote. Select “Channel Search” and type in the channel you are looking to find.
You can search for show and movie titles as well as names associated with different TV shows (cast members, directors, producers, etc.) right in your menu. Press “Menu” and under “Live TV” choose “Search”. Type in your search query and find listings of your favorite shows and movies, when they’ll be on, and on what channel.
Certain networks have allowed us to make up to 4 hours of programming available “in the cloud” with our time-shift feature. The channels that have time-shift are noted with an arrow-shaped box and are highlighted in blue within the guide. This feature does not require the DVR to access and does not use space in your DVR’s hard drive, if you do have a DVR.
Accessibility
The easiest way to turn closed captioning on and off is to press “Enter” found in the bottom right corner of the remote. Select “Closed Captions” and simply choose “On” or “Off.”
You can also turn closed captioning on and off by pressing the “Menu” button on the remote. Select “Settings” followed by “Television.” Choose “Closed Captioning” and this will bring up a screen that gives you the option to turn the captions on or off, but it also gives you options for “Digital closed captioning” and “Standard closed captioning”. Not every show on every channel has both digital and standard closed captioning, so the default is to have both set to “Closed Caption 1”. Each, however, can be turned on and off independently. Digital closed captioning also offers options to change the color of the text and the background as well as the size of the text, whereas standard closed captioning is simply white text on a black background.
The law requires that the vast majority of programs be closed captioned. This means that almost every show you see will be captioned, but there are exceptions. These exceptions include commercials, non-English language programming, programming that is primarily textual, programming between 2am – 6am, certain locally produced and distributed programming, and non-vocal musical programming. If you are sure that what you are watching should have captions and it doesn’t, check to see if both digital and standard captions are enabled.
If the show you are watching has digital closed captions, you can change the size, color, and opacity of the captions. Not every channel or program has digital captions available. Press the “Menu” button on the remote. Select “Settings” followed by “Television.” Choose “Closed Captioning” and this will bring up a screen that gives you the option to turn the captions on or off, but it also gives you options for “Digital closed captioning” and “Standard closed captioning.” Select “Change” for digital closed captioning and this will give you the options to change the text color, size, style, opacity and the color and opacity of the background.
If a channel or program has descriptive video available, it can be accessed the same way as accessing the Secondary Audio Program (SAP). Descriptive video is a feature made available by the network. Not all networks have this service available.
Audio
If a channel or program has more than one language or descriptive video available, you can switch languages by pressing “Enter” found in the bottom right corner of the remote. Select “Audio language” and it will show if there are other audio languages available. “Primary” is usually English and “Secondary” is usually Spanish or descriptive video. Choose the one you would like. If there is no secondary language available, it will only give “Primary” as an option.
If you would like to default to secondary audio every time it is available, press “Menu,” choose “Settings,” and then “Audio.” Select “Secondary audio” and change the option to “Use secondary audio if available.”
Most likely, the audio language has been switched. Some programs or channels offer alternative language options, like Spanish. You can check the language setting and switch languages by pressing “Enter” found in the bottom right corner of the remote. Select “Audio language” and it will show which languages are available. English is usually the “Primary” language. Choose the one you would like.
DVR
If you have a DVR, you can pause live TV and also rewind TV up to an hour from the current time or to the point when you tuned into this channel.
If you are watching a show you would like to record, you can simply push the “Record” button in the top left corner of the remote. A banner that says “Recording” will flash across the top of the screen. Your set-top box will have a red light on the front next to “Rec”. This will record the program you are currently watching.
If you would like to record something that has not yet started or something you are not currently watching. Press the “Guide” button. Navigate to the show you would like to record and push the “Record” button. You will see a red dot on the guide next to the program set to record. If you want to record a certain show every time it is on, simply push the “Record” button a second time. A banner that says “Series Recording Scheduled” will flash across the top of your screen and you will see three overlapping red circles next to the show each time it appears on the guide.
To cancel a recording, push “Record” one more time. A banner will flash at the top of the screen which says “Series Recording Canceled”. You can also cancel recordings by pressing “Menu” and selecting “Recorded TV”.
To access the shows you have recorded, press the “Recorded TV” button on the remote. This will take you to a list of the shows that have been recorded. Click on the show name that you want to watch then choose the episode, if you have recorded more than one.
You can also access your recorded shows by pressing “Menu” and selecting “Recorded TV”. Choose “View recordings” to see the list of shows you have recorded, or choose “Scheduled” to see a list of all the shows that are scheduled to record.
Your DVR has 500 gigabytes of storage. This means you can record and store about 80 hours of HD programming or about 200 hours of SD programming, or some combination of HD and SD programming. These numbers are approximate since different kinds of programming take up more or less storage space.
You may check the available space left on the hard drive of the DVR by opening ‘Menu’, then navigate to Settings > General > System Information > Sytem Resources. The ‘Disk usage’ is displayed in percentage remaining.
Your DVR is capable of recording five standard-definition (SD) television programs at one time. If you have high-definition (HD) TV, then you can record up to three HD and two SD programs at one time. If you are watching a channel, this channel counts as one of the programs. This means if you are watching an HD show, you can record two other HD programs and two SD programs. If you are recording the maximum allowed, try to change the channel, and the screen will go blue and say either “All HD services are in use. For HD viewing options, press OK” or “All TV services are in use. To proceed: power-off another TV receiver or select a recording to stop.” It will then give you options to stop recordings or stay on the channel.
- Call us at (802) 885-9000
- Email us at info@vermontel.com
- Send a message through our easy-to-use contact form